Fun with Pi: Network level ad-blocking with Pi-hole and the Raspberry Pi
Setting up and running a network-wide ad blocker on the Raspberry Pi

The internet and ads, name a more iconic duo.
In exchange for nearly instant and “free” access to huge swatches of the world’s porn knowledge, all you have to do is endure a near relentless barrage of ads with every click. To complicate matters, ads are usually the visible artifacts of a campaign where your privacy should be concerned. Throw in a few trackers and a dash of malware and Toto, I’ve a feeling we’re not in Kansas anymore.
Today, we’ll be looking at one of the tools at your disposal to help make the internet suck a little less: Pi-hole!
Pi-huh? What’s a Pi-hole?
Pi-hole touts itself as both an “A black hole for Internet advertisements” and a DNS sinkhole. In simple terms, Pi-hole acts as a doorman for your network. It’s job is to grab a stool and sit at the door, checking IDs and turn away anybody who doesn’t belong while letting everyone else though.
In less simple terms, it’s a tiny DNS server which sits between the internet and your network. When a request is issued, the DNS resolution request is handled by Pi-hole. Pi-hole will consult it’s naughty lists and if the domain is found, the request is rejected. If the domain is well behaved then Pi-hole will forward the DNS request to a public DNS server for resolution.
In my opinion, this setup has two major wins:
- It covers all of your (well behaved) devices on your network – this includes laptops, tablets, phones, or even your smart fridge. Unlike browser plugins, this coverage extends to non-browser locations such as mobile apps and fridge-twitter.
- You are in control. Pi-hole is free and open-source and you host it on your own hardware. The reduced risk of a plug-in being hijacked or an author getting cash-slapped by somebody less-than-altruistic is probably worth the price of admission alone.
Update 6/5/2019: Google has announced changes to how extensions work which may cause popular ad-blocking extensions from being as effective. These changes have not yet taken effect, but it highlights some of the fragility with the current browser/plugin system.
Hardware
First things first, it should be said that despite the name you are not limited to running Pi-hole on only the Raspberry Pi. Check the list of officially supported operating systems, there’s also a docker container.
This guide will be based on settings up a new Raspberry Pi 3 Model B+ from Windows 10. Here’s the shopping list. You may already have some of these parts laying around. I already had my power supply and will be printing my own case.
- Raspberry Pi 3 Model B+
or (alt)
- Pi-hole can run on pretty low-spec hardware so you have flexibility here if you want to save a couple of bucks.
- Here is Raspberry’s suggested MSRP price list as a guide.
- MicroSD Memory Card
- 32 GB should be sufficient, but the more the merrier.
- Class 10 cards should be preferred.
- Performance comparisons.
- 5V 2.5A USB Power Supply
- There’s many options at varying price points and quality. If you’re willing to spend a couple of extra $$ for some peace of mind then you should seek out UL listed supplies.
- USB SD Card Reader
- You’ll need to be able to write to your MicroSD card. If your system doesn’t have a reader available make sure to grab a USB one.
- Case
- Optional, but recommended. Just make sure the case is compatible with Raspberry model you intend to use.
If you don’t want to do a lot of shopping, there are kits such as the CanaKit available. These kits include nearly everything you need to get started in a single package. There also may be cases where you lose remote access or want to connect to the Pi directly. On those occasions you’ll want an HDMI cable and USB keyboard handy.
Software
Time to get started! I’ll be running my Pi with a wired network connection and headless, which means without a connected monitor.
Prep the SD card
For the operating system I’ll be using Rasbian Stretch Lite (v4.14 as of this writing). Go ahead and download a copy. On completion you can insert your SD card write the image onto the SD card. I’ll be using Etcher, but feel free to use Rufus or your favorite alternative.
Etcher makes it pretty painless as you don’t even need to extract the image from the zip file. Simply pretty “Select Image”, choose the zip file then proceed to select the SD card by pressing “Select drive”. All that’s left is to mash ‘Flash!’ and wait for the process to complete.
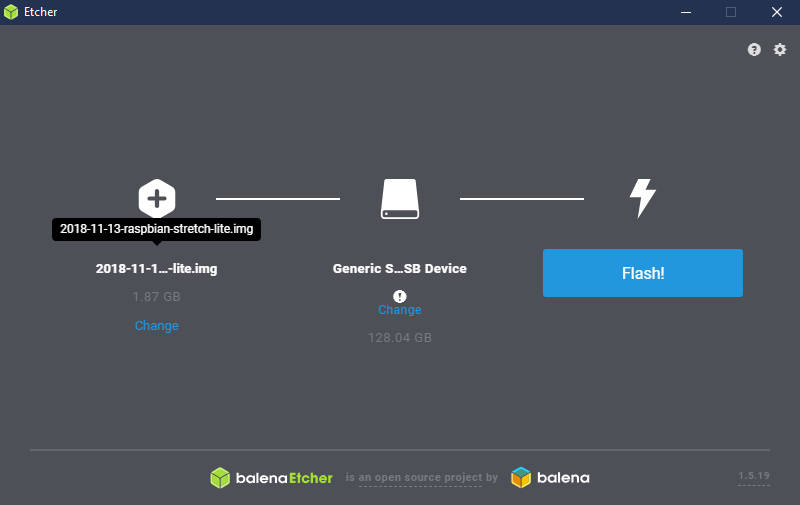
Writing the image to the SD via Etcher is just a 1-2-3 step process.
Enable SSH
Without a monitor we’ll need to be able to connect to the Pi remotely. For this we will need to enable SSH on the Pi, as it is disabled by default. Luckily we can enable it by creating an empty file named “ssh” (without any extension) into the root directory of the SD card. When the Pi boots it will detect the file and enable SSH access. If you skip this step and configure the Pi connected to a monitor you can always go back and enable SSH via raspi-config.
Configuration & Install
Now that our card is prepped we’re ready to fire this bad boy up. Insert your SD card into the Pi and connect the power and the Pi should boot up. Prior to connecting, we’ll need to locate the IP address of our Pi on our network. With IP in hand, fire up your favorite SSH client. I’ll be using Putty.
Open Putty, then in the “host name” box enter the IP address for you Pi then hit Open. If this is your first time connecting, you’ll be presented with a warning about fingerprint authenticity and if you’d like to continue. Type yes to establish the connection. Once connected, you will be prompted to login. Under Raspbian the default user is pi with a password of raspberry.
The first order of business is to run a software update via sudo apt-get update && sudo apt-get install
Raspbian comes with a configuration utility to help you set up your Pi. It’s a pretty good idea to go ahead and change a couple of things like host name and default password. You can invoke the configuration utility by running sudo raspi-config
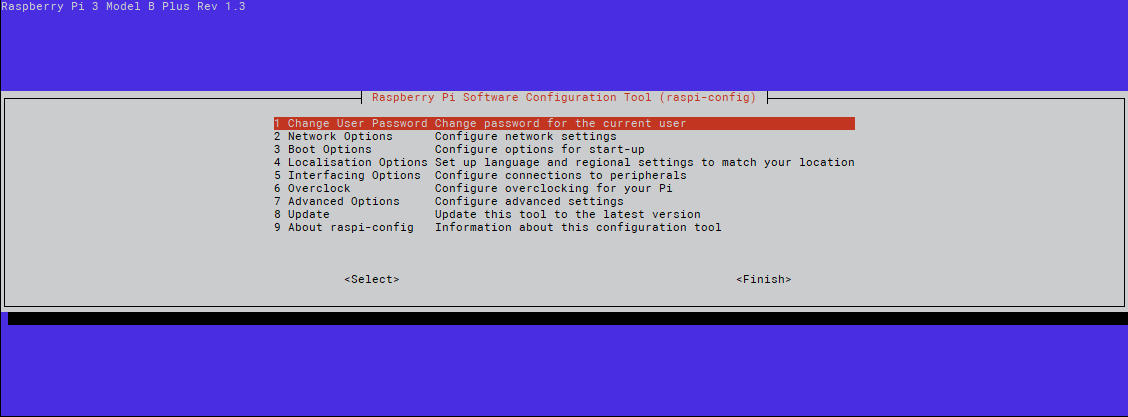
The raspi-config configuration utility
You can browse the dialog using the arrows, tab and enter. I’d recommend the following:
- (1) Change the default password This is pretty straight forward, just run through the dialogs and update the default password.
- (2) Network Options > N1 Hostname This is the name of the machine. By default this is
raspberrypi - (4) Localisation Options > I2 Change Timezone The Pi defaults to the UK. If you’ve already completed your Brexit or hail from another region this is where you can configure timezone.
- If you didn’t enable SSH prior to booting you can also enable it under (5) Interfacing Options > P2 SSH.
After you complete the configuration select <Finish> and the Pi will reboot. We’re not quite done yet however as we want to setup the Pi with a static IP and for this, we’ll need to edit a configuration file.
Note from the Future: The Pi-hole installer also allows you to configure the Pi’s IP as part of the install process so feel free to skip this step.
sudo nano /etc/dhcpcd.conf

## Add the following lines to the bottom:
interface eth0
static ip_address=192.168.1.10/24  ## This is the IP we want our Pi to use
static routers=192.168.1.1 ## IP address for your gateway, typically the IP of your router.
static domain_name_servers=192.168.1.1 ## The IP address for your DNS, again, typically your router.
Save the file by Ctrl-X then issue a sudo reboot to reboot. Once the Pi boots back up you should be able to connect to it using the new IP address you configured.
Install Pi-hole
Home stretch! Time to install the Pi-hole software. I’ll be using Method 2, the “manual install” which will let you configure Pi-hole as part of the install process:
wget -O basic-install.sh https://install.pi-hole.net
sudo bash basic-install.sh
During the install process you’ll be prompted for a few of items.
- Select the default network connection, which in my case would be
eth0since that is my Pi’s wired connection (wlan0 if you’re using wireless). - Choose the default DNS provider. This will be the DNS provider queried for non-blocked requests. I chose to use Cloudflare (1.1.1.1).
- Select default blocklists. This will allow you to deselect any blocklists you don’t want to include. You can add and remove these as well post-install.
- Configure static IP. You can update the IP configuration for your Pi here. I did this via configuration file, so I’ll be continuing with the existing settings.
- Install the UI. You can choose to run without the web control panel but I’m keeping mine enabled.
- Install web server. This is to serve the web UI in case you wanted to use a different setup. I’ll be leaving this On (lighttpd) by default.
- Enable query log. Here’s where you can toggle if DNS queries should be logged. This can be changed post-install in the UI if you change your mind.
- Configure privacy mode. This changes the information that appears in the logs and on the UI. I left this default to
Show everything
At this point Pi-hole will continue it’s install process. Once it completes it will (hopefully!) display a “Installation Complete!” screen with some important information, such as the Pi’s IP addresses, UI address as well as the generated admin password. If you updated your IP address now would be a good time for a reboot.
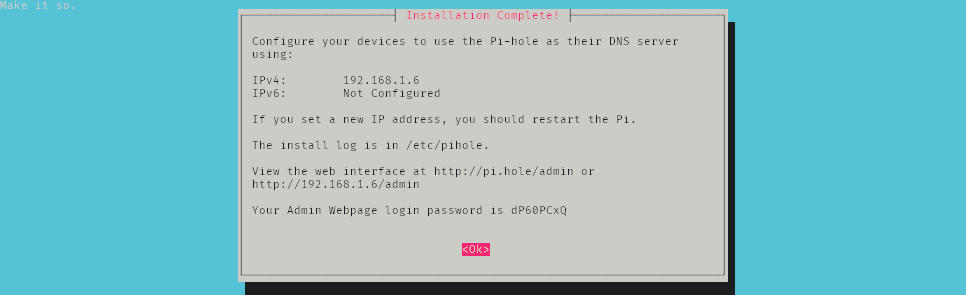
Installation Complete! The post install confirmation screen includes all the pertinent details you’ll need post-install.
At this point, you’ve got a base Pi-hole up and running. You can now log into your Pi-hole admin panel by visiting http://
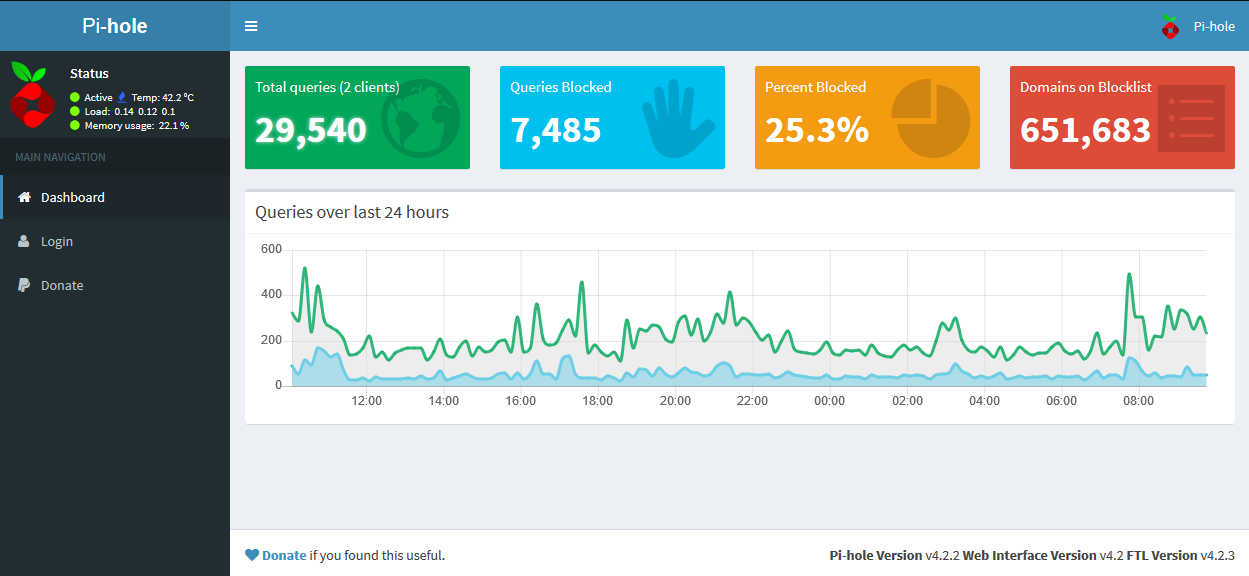
The Pi-hole God Console™
The final step is to configure your router to use Pi-hole as it’s primary DNS option. Due to the large swath of router makes and models avaiable, you’ll probably need to hit up Google for some assistance if you get lost.